Stop Soloing Tracks When You EQ
Soloing a track to EQ it removes the only thing that matters — the mix. Here's how to EQ in context by seeing and editing every track's spectrum from one window.
Every tutorial starts the same way. Solo the track. Sweep a bell boost around until something sounds ugly. Cut it. Unsolo. The mix sounds... exactly the same. Or worse.
That's because EQing in solo is solving problems that don't exist — while the real problems stay invisible.
Why Solo EQ Doesn't Work
When you solo a track, you hear every frequency exposed. That 300Hz bump on the vocal sounds muddy. That 2kHz peak on the guitar feels harsh. So you cut them.
But in the mix, that 300Hz was never a problem — the bass was masking it completely. And that 2kHz peak? It was the only thing keeping the guitar audible above the synths. You just removed the one frequency that mattered.
Solo removes context. Context is the only thing that determines whether a frequency is a problem or not.
A frequency that sounds ugly in solo might be inaudible in the mix. A frequency that sounds fine in solo might be clashing with three other tracks. You can't know either of these things with the track soloed.
The Problem With "Just EQ in Context"
You've heard the advice before. "EQ in context, not in solo." Everyone says it. Nobody tells you how.
The mix is playing. Thirty tracks. You're staring at one EQ on one track, making a 2dB cut at 800Hz, trying to hear what it's doing against everything else. You can barely tell if it's changing anything.
This is where most people give up and hit Solo again — because at least in solo, you can hear what you're doing. The frustration is valid. EQing in context is the right approach, but without a way to see what's happening across tracks, it's nearly impossible to execute.
You need to see what the other tracks are doing in the same frequency space. Not guess. Not memorize a chart. See it.
See Every Track From One Window
Load THE_EQ on multiple tracks in your session. Open any instance and a sidebar appears showing every other track running the plugin — with each track's spectrum analyzer overlaid on the same graph.
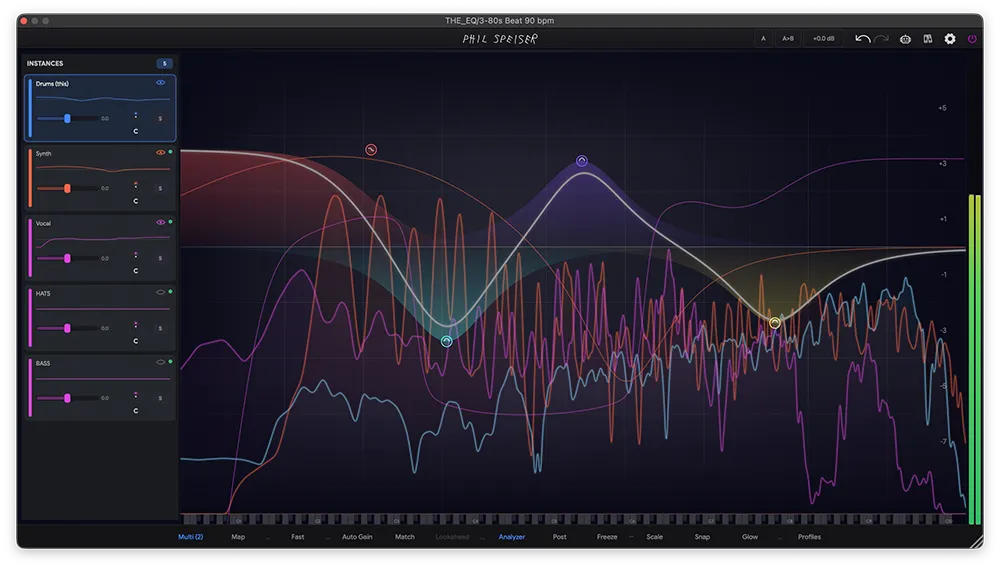
Every colored line is a different track's frequency content, updating in real time. You can see exactly where the drums, bass, synth, and vocal are all competing — without leaving this one window.
Click any track in the sidebar. Its EQ curve appears and you can edit it directly. Click "Synth," pull down a band where it's clashing with the vocal, click back to "Drums," adjust a shelf. The mix never stops playing and you never switch a single plugin window.
THE_EQ automatically detects what type of audio is running through each instance — kick, vocal, bass, guitar, synth, strings, or horns — and labels it in the sidebar. No manual naming. Your session organizes itself.
Shape Multiple Tracks at Once
Seeing every track is powerful. But sometimes you need to act on multiple tracks at once — and that's where Linked Bands come in.
Select multiple instances in the sidebar by holding Shift, add a band on one of them, and it appears on all of them — linked. Change it on one, it changes on all.
Got six vocal tracks that all need the same low cut and a bit more air in the highs? That's one move, not six. And if the lead vocal needs something different — just unlink it. The linked band becomes independent on that instance while the rest stay locked.
This is EQing in context taken to its logical conclusion. You're not just seeing how tracks relate to each other — you're shaping them together.
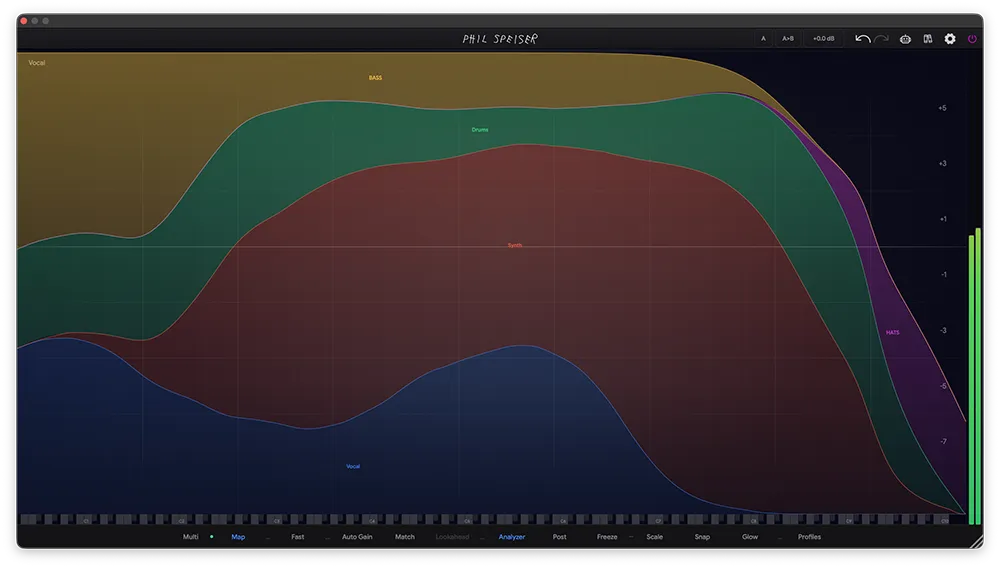
See Where Every Frequency Is Taken
Multi mode shows you the raw spectrums. The Frequency Allocation Map takes it further — it divides the entire frequency range into colored regions showing which track owns which frequencies.
Each color is a different track. Where colors overlap, tracks are fighting. Where one color dominates, that track owns the range. You're looking at the entire frequency real estate of your mix in one image.
Here's a simple example: put only the kick and bass in view. You'll see they share most of the low-end space pretty equally. Now high-pass the bass — and watch the map change completely. The low frequencies are suddenly fully owned by the kick. You're watching your mix rebalance in real time.
No guessing. No soloing back and forth. The full picture, one glance.
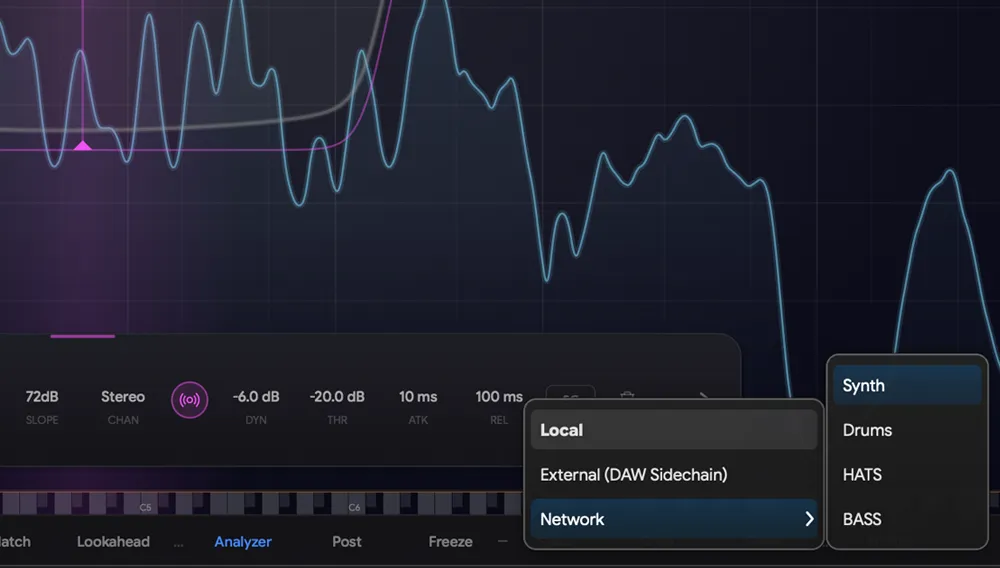
Some clashes only happen when both tracks are loud at the same time. Use THE_EQ's dynamic mode on a band — set the sidechain to "Network" and pick the clashing track as the source. The cut only engages when the other track is actually present. When it drops out, your full tone comes back.
Let the EQ Find the Clashes for You
You don't even have to look for the problems yourself. Select a competing track in the sidebar and THE_EQ runs a continuous collision analysis between the two spectrums. When it finds frequencies where the other track is masking yours, translucent Ghost Bands appear directly on the graph — hovering over the exact collision zones.
Each Ghost Band is a suggested fix. Click one and it becomes a Cleanup Band — a dynamic EQ cut precisely tuned to the clashing frequency range, sidechained to the competing track. It only ducks when the other track is actually present. When it drops out, your full tone comes back untouched.
The entire workflow: open the EQ, select the competing track, click the Ghost Bands. That's it. The plugin identified the collision, calculated the fix, and applied a dynamic correction — in fewer clicks than it takes to solo a track and sweep around with a bell boost.
If the collision goes away — maybe you changed an arrangement or swapped a sample — THE_EQ detects that the Cleanup Band is no longer needed and flags it. No stale cuts quietly eating your tone months after you've forgotten why they're there.
Do this across a full session — drums, bass, guitars, synths, vocals — and every track sits in its own space. Not because you memorized a frequency chart, but because the plugin analyzed the actual spectral relationships and showed you exactly what to fix.
Context Is the Mix
The mix is not something you listen to after you've finished EQing. The mix is the context for every EQ decision you make. A cut that sounds wrong in solo might be exactly right in context. A boost that sounds great in isolation might be destroying clarity when everything else is playing.
Stop soloing. Start seeing.